Workflow Emails
A Send email step sends one of your workflow emails. Workflow emails live under Workflows → Emails and are separate from the built-in email templates Allegro uses for sign-in links and similar messages.
Creating an email
- Go to Workflows → Emails and click New email.
- Type the email's Name in the page header, where it says "Untitled email".
- Write the Subject, an optional Preview text, and the body on the Content tab. The Preview panel beside the editor shows the result with example values. Switch it between Desktop, Tablet, and Mobile widths.
- Choose the email's settings on the Settings tab.
- Click Create email. Save later edits with Save or ⌘S (Ctrl+S on Windows).
A new email opens in the builder with a greeting, Hi {% member_name %},. Type
/ on an empty line to add text, headings, buttons, images, dividers, and more.
Your email theme styles every block, so the email matches
your other email without any design work.
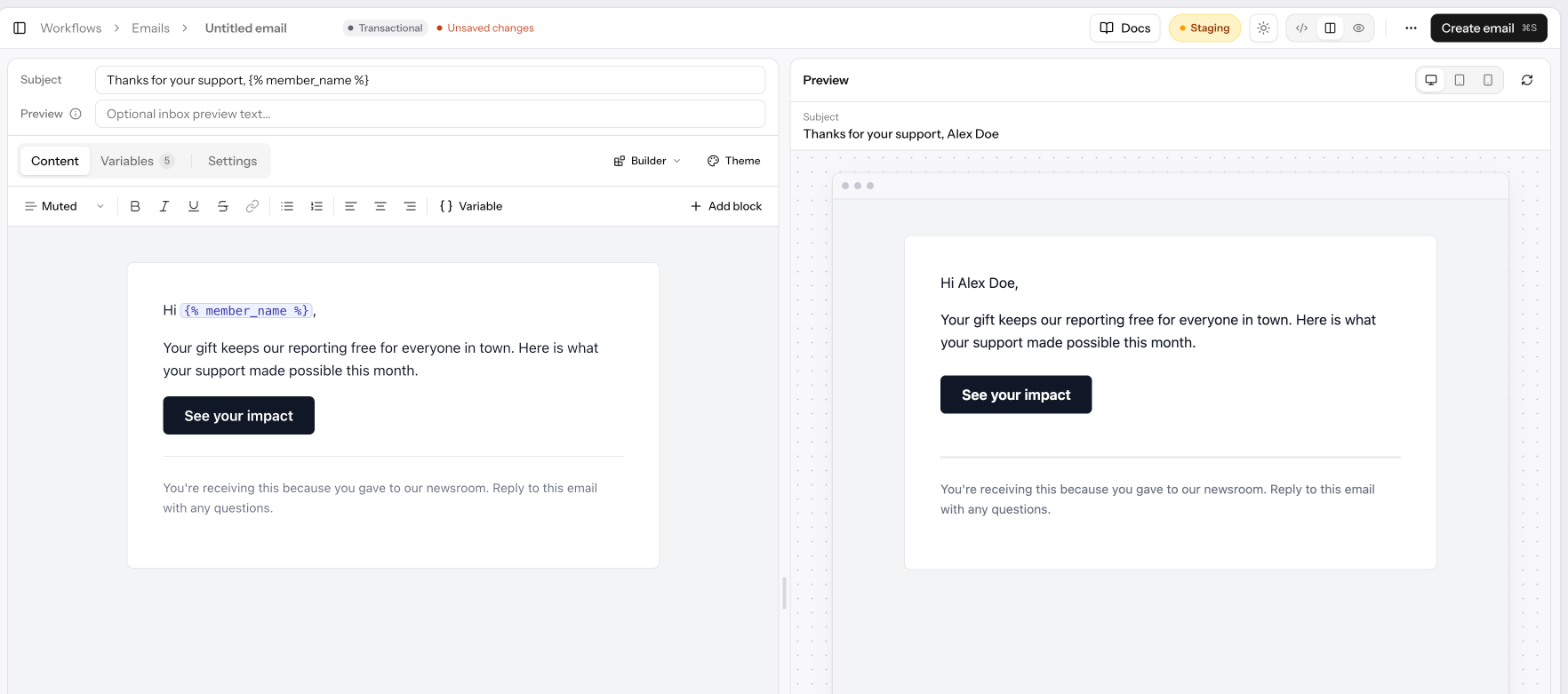
To write the HTML yourself instead, open the Builder menu beside the tabs and choose Convert to HTML or Write HTML from scratch. Turn on Use email theme so later changes to your theme still reach the email.
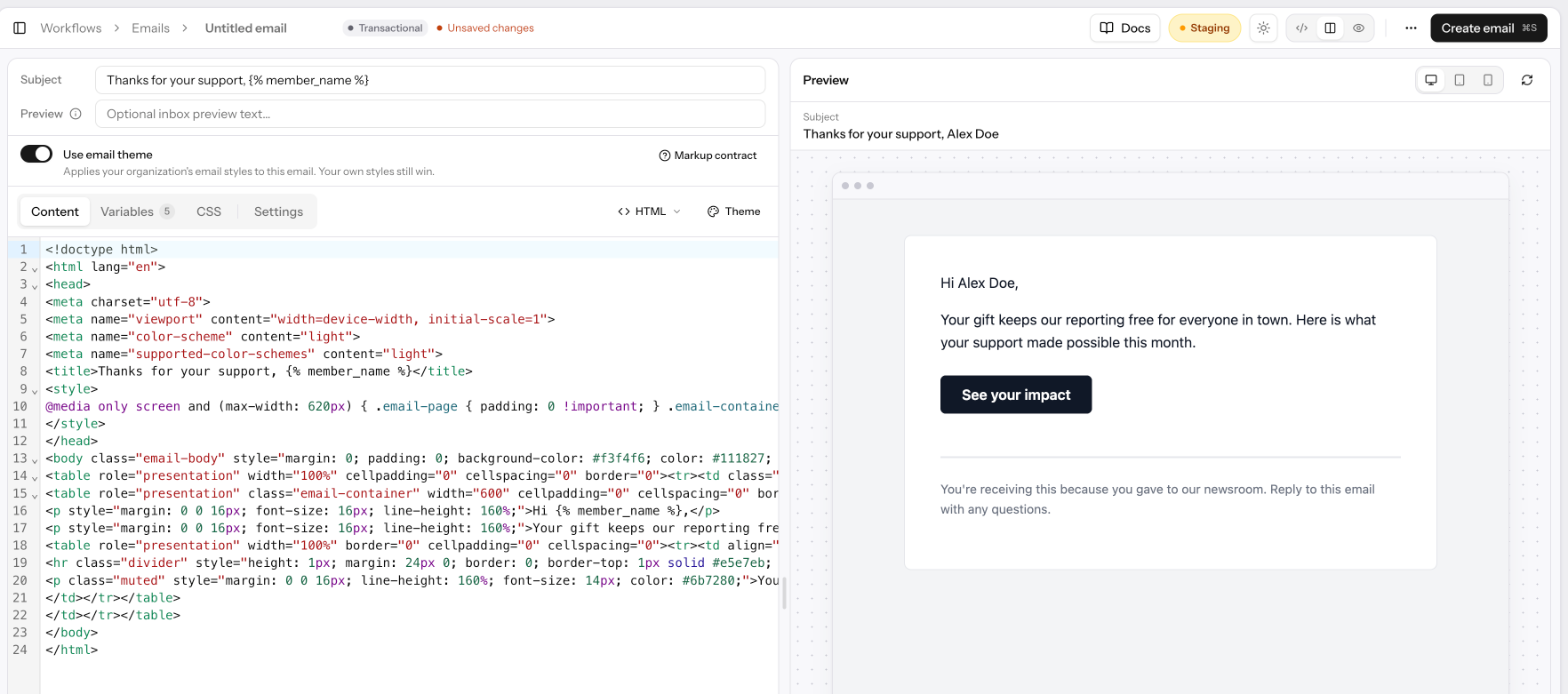
See Building Emails for every block, the HTML editor, and switching between the two. To change theme settings for one email, click Theme beside the tabs; see Overriding the theme for one email.
| Setting | What it does |
|---|---|
| Kind | Transactional or Marketing. See below. |
| Topic | Marketing only. The topic the email belongs to, or No topic. |
| Property | The property the email is sent and branded as. Choose Organization to let the run decide. See Which property sends. |
The buttons in the header switch the editor between code only, code and preview side by side, and preview only. Drag the divider between the two panels to resize them.
The emails list shows each email's kind, topic, property, and how many workflows send it (Used by). Each email's menu has Edit and Delete. An email can't be deleted while a published workflow sends it. Runs already in progress that reach a deleted email still send it.
Preview text
The Preview field below the subject sets the short line most inboxes show after the subject, before the email is opened. It takes the same placeholders as the subject, up to 255 characters. Allegro adds it to the top of the email, hidden, so it doesn't appear in the opened message.
Leave it empty and most inboxes show the first text of the email instead, which is often a header or "View in browser" link.
Sending a test email
Open the ⋯ menu in the page header and choose Send test email to send
the email to your own address. It goes out through your organization's email
provider as the email's property, with each variable's example value in place of
the recipient's details. {% event.<field> %} placeholders are sent as written,
because a test has no event.
The test uses the last saved version. If you have unsaved changes, Allegro asks you to confirm before sending the saved one.
Transactional and marketing email
| Kind | Use it for | Opt-outs |
|---|---|---|
| Transactional | Receipts, confirmations, account notices. | Always sent, even to members who opted out of marketing email. |
| Marketing | Drips, reminders, nudges, newsletters. | Skipped for members who opted out of all marketing email or of its topic. |
A marketing email must include the {% unsubscribe_url %} placeholder, usually
as a link in the footer. Allegro won't save a marketing email without it. In the
builder, select some text, click Link, and choose {% unsubscribe_url %}
with the { } button. In HTML:
<p><a href="{% unsubscribe_url %}">Unsubscribe</a></p>
Marketing emails also carry the standard one-click unsubscribe headers, so mail apps that support them show their own Unsubscribe button.
Only use Transactional for messages a member needs regardless of their marketing choices. Sending promotional content as transactional email ignores the member's opt-out.
Placeholders
Type {% in the editor to see suggestions, or choose a variable on the
Variables tab to insert it where the cursor was in the subject, preview
text, or body. In the builder, the toolbar's Variable button inserts one
too.
| Placeholder | Resolves to |
|---|---|
{% member_name %} | The recipient's name. |
{% member_email %} | The recipient's email address. |
{% unsubscribe_url %} | A personal link to the unsubscribe page. Required in marketing email. Empty in transactional email. |
{% property_name %} | The name of the property the email is sent through, or your organization's name when there is none. |
{% organization_name %} | Your organization's name. |
{% event.<field> %} | A field from the event's data. See below. |
Event data
{% event.<field> %} inserts a field from the event's data, for example
{% event.amount %} for a donation amount. Nested fields use dots:
{% event.cart.items %}.
The event is the one that started the run. After a Wait for event step's Event happened path, it is the event the run waited for instead.
Event fields aren't on the Variables tab or in the preview, because they depend on the workflow. A placeholder for a field the event doesn't carry is sent as written, braces and all, so check the field names against the event before publishing. Run the workflow in the Test panel with a sample payload to see the subject a member would get.
Custom variables
An email can define its own variables, so each workflow that sends it can fill in something different, such as a discount code or a closing line. Add them on the Variables tab under This email's variables:
| Field | What it does |
|---|---|
| Name | How the email refers to it, as {% name %}. Lowercase letters, numbers, and underscores, and not a built-in name. |
| Description | What the value is. It labels the field in each Send email step. |
| Default | Optional. Sent when a step leaves the value empty. Without one, every step that sends the email must fill it in. |
Use the variable in the subject, preview text, or body like any other placeholder. The preview and test emails show the default, or the placeholder itself when there is none.
Each Send email step fills in the email's variables.
A step's value can include other placeholders, like {% event.amount %} or
{% member_name %}.
Adding a variable without a default to an email that a published workflow already sends doesn't block that workflow. It sends the variable empty until you fill it in on the step and publish again.
Which property sends
An email is sent and branded as one property, and {% property_name %} shows
that property's name. Allegro picks the first of these that applies:
- The Property chosen on the email.
- The property the event happened on (the awaited event after Event happened, otherwise the event that started the run).
- The workflow's property, when its settings limit it to exactly one.
- Your organization.
Workflow emails are delivered through the sending service of the property they are sent as, or your organization's default. They never send from Allegro: a workflow that sends email can't be published until a sending service covers it, and a Send email step that reaches a member with none set up is skipped with the reason no sending service. See Sending services.
Choosing a sender
Each Send email step can choose the sender the email comes from: its From name, From address, and Reply-To. The list shows your organization's senders and each property's, grouped by where they belong. A step can choose any of them.
Leave the step on Default sender to use the default of the property the email is sent as, or your organization's default when that property has none.
If a step's sender is deleted, a workflow that's already running sends with the default sender instead. A draft that still points at the deleted sender can't be published until you choose another one. A sender that a published workflow sends as can't be deleted.
Topics
Topics group marketing email by subject, such as "Weekly newsletter" or "Event invitations", so members can unsubscribe from one topic and keep the rest. Manage them under Workflows → Topics.
Click Add topic and give it a Name, a Slug (generated from the name if you leave it empty), and an optional Description. The topics list shows how many emails use each topic.
A topic can't be deleted while a marketing email uses it. Deleting a topic also deletes members' opt-outs from it.
The slug is how a developer refers to the topic when building a preference page on your site. See Email Preferences.
Opt-outs
A member is opted out of marketing email in one of four ways:
| Source | How |
|---|---|
| Unsubscribe link | The member followed {% unsubscribe_url %}, or used their mail app's unsubscribe button. |
| SDK | Your site's own preference page opted them out. See Email Preferences. |
| Admin | Someone added the opt-out on the member's Email tab. |
| MCP | An AI client or script added it through the MCP server. |
An opt-out covers either all marketing email or one topic. When a Send email step reaches a marketing email, it skips the member if they opted out of all marketing email, or of that email's topic. Transactional email is never skipped.
The unsubscribe page
The unsubscribe link opens a page on your Allegro domain, branded like your sign-in pages. It needs no sign-in. The member chooses:
- Unsubscribe from <topic>, when the email has a topic.
- Unsubscribe from all marketing email, always.
The page confirms the choice straight away. A mail app's one-click unsubscribe button opts the member out of the email's topic, or of all marketing email when the email has no topic.
The member's Email tab
Open a member under Audience and select the Email tab to see their Opt-outs: what each covers, where it came from, and when.
- To add one, choose All marketing email or a topic under Opt out of and click Add opt-out.
- To remove one, use the remove button on its row. The member starts receiving that marketing email again, so only remove an opt-out when the member asked for it.